The Technology Class taught me many valuable tools which I did not know and have made my life much more simple since learning them.
One of the most valuable things I learned is based on using the "print screen" and "control" buttons at the same time. When you press both at the same time, you essentially copy everything that is on your computer screen. Then, simply go to the "Paint" program in your "Accessories " Section and paste it. Then you can select the portion of the picture you want. After you select it, open a new paint page, and paste that section of the picture. Then you save it as a JPEG and can open it from the blog, or whatever program you are using.
Technology is a very useful tool in teaching because it can make learning so much more fun. The education system is changing quickly, and technology has become a big part of it. Teachers need to update their skills regularly to keep up with the passe of change.
Having a classroom blog is useful. Having the class partake in a WebQuest activity is also very educational and engaging for the students. having access to an interactive white board in your classroom makes teaching a lot easier and offers many learning opportunities. During my last placement, when the students were performing a play, they used the interactive white board as a set enhancement and they had relevant pictures up as a backdrop for their performance.
Teachers need to embrace these changes and support each other to gain confidence in using technology. However, per cautions need to be taken to ensure safety is the number one priority.
Teachers need to make sure they do not post pictures of students up on the Internet for all to see. They also need to check all the websites students will be using before they can go on them. Finally, a system needs to be set in place when a student accidentally gets something on their computer screen which is not kid friendly.
This may involve, quickly turning off your monitor and telling the teacher. Then the teacher can fix the problem and inform the school about the web site that it needs to be blocked. Then the students parents need to be told about what happened and how their child did the responsible thing, telling a teacher.
Another area of concern is the dependency on technology today. Students often depend on spell check to check their spelling. This results in students just mindlessly making spelling mistakes because they know the computer will fix it later.
All of these issues related to technology need to be considered before using it in the classroom. Overall, technology offers many educational advantages which need to be utilized.
Friday, October 22, 2010
 Sketch Swap is another interesting website. You make a sketch and then submit it and you get a sketch back which was made by someone else. As you can see from the sketch I received from above, it is possible to get something very nice back. However, you have no control over what you receive which makes it not a good tool to use in the classroom. When using technology in the classroom it is important to protect the children and control things to ensure they do not get exposed to something harmful at school. Thus, because the teacher can non control what their students will view on this web site it is not recommended to use it.
 However, I noticed that it was very exciting to wait and see what I was going to receive. Thus, ideas from this web site are valuable. Possibly, you could arrange an art exchange program with another school or another classroom. In this case, teachers would be involved on both sides, the delivery and the receiving end, which would ensure it would be safe, educational and fun!
Wednesday, October 20, 2010

Another great web site we were shown during the Learning Teachnologies workshop is xtranormal. it is a really good web site for students who are at a high level at animation. This web site requires you to join. It is getting more and more popular all the time. It uses face recognition technology which is quite advanced.


This program is called Catchment Detox. This is a really great program for students and it can be very competitive. There has been instances of students winning prizes for doing well in this game. The concept is based on building an environmentally sound environment with limited funds. However, using this game in the classroom requires a lot of time. Likely a whole term. Also it is only suitable for the older grades, 5 and 6 is the youngest.
Monday, October 18, 2010
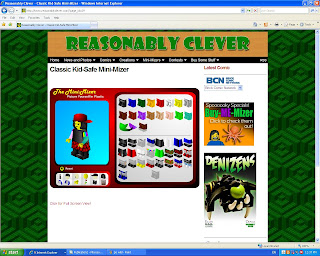
some other great websites are Reasonably Clever but you need to choose the minimizaer option and and shoose the classic kids safe zone option. Here they can create their own leggo character and save it. i personally preferred the build your wild self character creation site but possibly my male students would prefer this version, thus it would be a good idea to give them the option to choose which program they would prefer to use.

Build Your Wild Self is a great web site which is very suitable for students. Students get to choose a variety of characteristics to make themselves have different animal body parts. I would use this in my classroom. Possibly, I would use it as a starting point to write a creative story. It could also be used by students to allow them to express the kind of person they are. Possibly, a really lous person would give themselves a lot of lion characteristics and a really musical person may give themselves a lot of bird characteristics. I would require the students to explain their reasoning for choosing certain animal characteristics. This would be a good activity at the beginning of the year to understand more about the students and to help them learn about each other.
First week back after 2nd placement
After returning back from practicum it feels very strange to back. I have learned a lot and I really just want to start teaching. My second practicum school had an interactive white board in the class. I really enjoyed using it. Last technologies lecture we were shown how to make animations. It is possible to use leggo, clay or other material. You just have to start and stop the video and then put it all together with a computer video editing program.
However, if this is not possible, there are a variety of other options are possible. This includes just simply using powerpoint and making animations with the words. Also, you could slowly change each slide to make an animation. It is even possible to use a phone book and have them just draw images on the corner of the page.


However, if this is not possible, there are a variety of other options are possible. This includes just simply using powerpoint and making animations with the words. Also, you could slowly change each slide to make an animation. It is even possible to use a phone book and have them just draw images on the corner of the page.
It is important to teach the students the process of making an animation. This involves, creating a story board. This also involves learning how to use the technology. For example, how to speak in the microphone, start and stop the video, and use the computer program.
Today, we also learned about dfilm.com. It is a great little web site to create short animations. Although, some of the characters are inappropriate for young students.
The other computer program we learned about was Zimmer Twins.
With this web site you can make cute animations and choose what they say. You need to choose the make from scratch option.Monday, August 16, 2010
Week 4: Graphing made fun!
 This is an example of what you could do with your students to make the graphing tasks a little more fun. Students love to choose pictures from Google images and creating something that is individual. Allowing students to choose a graph style and the other graphing options makes it more exciting for them too.
Week 4: Graph Task
It is possible to teach maths with food. In this case smarties. You could have the students make predictions about what they expect they will find in a package of smarties. They could simply graph their findings. They could also survey other students about their 'Smartie' preferences. You could teach them how to color their graph to make it relevant to what the graph is about. Simply, right click on a column and choose 'format data series'. Then, select 'fill' and then choose the color.
Week 4: Student Comprehension Task
 These images were taken from Dust Echoes: Ancient Stories, New Voices web site. It is a great website with a variety of Aboriginal stories to choose from. Some of the stories may be too scary for some students and this needs to be considered.
You are able to get the background information on the traditional story and you are able to watch a picture animation of the story as well. This is a great example of a task you could ask your students to do, which would be educational and fun.
Ask the students to become knowledgeable about the story and then create a story summary using the images and the Inspiration program.
This requires the students to press the control and the print screen buttons at the same time. Then they will past the image in the paint program. Next, the students cut the content of the image they want. Next, they paste it on a new paint page. Finally, they save it as a JPEG and open it up in the Inspiration program. This example, was places in a circular formation because the story it was based on "Morning Star" is based on the circle of life. The pictures were number as well to clarify the order. More text could easily be added.
This type of task requires students to choose the important parts of a story and use computers. This task will help with story comprehension. Doing it, is a lot for fun than putting random sentences in order to reflect the proper sequence of events. I will use this in my future classroom.
Tuesday, August 10, 2010

Week 3: Fun Online Quizzes
Today, we also learned about a great program which allows you (i.e. the teacher) or the students to make fun quizzes. The types range from flash cards to a variety of other games. One is called "from rags to riches." They are fun and relatively easy to create.
1) Go to www.quia.com/web
2) Subscribe to the 30 day trial offer
3) Create a user name and password
4) Go to "create a new quiz"
5) Choose the quiz type and create the title, questions and indicate the answers.
1) Go to www.quia.com/web
2) Subscribe to the 30 day trial offer
3) Create a user name and password
4) Go to "create a new quiz"
5) Choose the quiz type and create the title, questions and indicate the answers.


Monday, August 9, 2010
Week 3: Technoology Design Brief
August 10, 2010
Today, we did a great activity called a design brief. it was based on making a little picture of a frog jump. We were given a small piece of cardboard, a rubber band, and a limited amount of sticky tape. We were required to work in partners.
The method is based on:
1) Investigate/Design
2) Produce
3) Analysis/Evaluation
These headings can be placed on a page and the students are encouraged to fill out the sections. In the Investigate/Design section- students write their thought processes. E.g. "We thought of folding the cardboard in the middle and then we decided to fold it at the end."
In the produce section- The students write what they actually did. E.g. "I folded the paper into 3." The students write the stages of what they tried to their final product.
In the final section, the students analyse their creation. This could be done after everyone shares their ideas. This is an opportunity for students to practice some higher order thinking. They could describe how they could have made their "jumping frog better" or why their design was effective.
An important component is sharing and reflecting on what they did. The students should be given a couple days to complete their final draft. The final products are great to use to decorate the classroom. Incorporating design briefs into your regular teaching routine makes learning more fun, especially if the problem is presented as a surprise. This could be achieved by using "secret envelopes" with the problem. Using this teaching strategy helps to improve student speaking skill and other related topics could be liked to these problems. In this situation, it could be used to initiate a discussion or lessons on energy because rubber bands have energy potential.
Other skills also required in this type of lesson include, writing skills, eye coordination, team work, problem solving skills etc., Thus, it is a very good lesson format to use in my regular classroom.
Monday, August 2, 2010
Week 2: Brochure
 Here is what I completed in Microsoft Publisher today. It is a great program and can be used in the class for class activities. For example, if the class is studying the solar system, they could choose one planet and make a brochure to promote vacationing on that planet. It is also useful for making eportfolios. An eportfolio is a useful tool to bring to an interview. As, it will help the panel better understand my abilities and whether or not I am the best person for the job.
An eportfolio can also be used by a teacher to document a students work. However, the teacher must choose carefully because the purpose it to see the development in the student's work over the year. Thus, if you include too much work, that development will be more difficult to observe.
For the eportfolio the best layout is the web page and then modify it to suit your needs.
Tuesday, July 27, 2010

Monday, July 26, 2010
Week 1: Why is this taking so long?


During this lesson I learned about using some programs which could facilitate learning in my future classroom. Specifically, I learned how to create a "blog" and edit it. I also learned how to use the "Inspiration" program. A Blog can be understood as a tool to document something over a time period. Adding writing and images to the blog is relatively easy. Although, it is best to write in the blog directly because it is not as simple as one would think to write in Microsoft word and paste it or open it up in the blog. Unfortunately, I had to print my writing piece from Microsoft word and now I am typing it again in the blog directly. I tried using the control/print screen function and cropping it in the paint program but, it was too long to get on the whole screen. The length of the writing made things more complicated or more problematic. Wait! I just thought of a solution! I will change the view size in Microsoft word to 75% so I can copy the whole image using the control/print screen function. Then it will be relatively easy to crop in the paint program. Then I won't have to write it all again! Yay! Here is what I initially wrote:

Eeeeeeerrrrrrrrrrrrr! It's too small. Now, I simply copied and pasted it into the paint program by creating a text box. Here it is now.
Subscribe to:
Comments (Atom)